In a time long ago, when Ariesna was first moving in with me, we purchased a pine coffeetable at a garage sale for ~$251. It was nothing special, just something that we knew would serve as a place to rest our feet on from the couch and a spot to drop some books. When we bought it; we didn’t really care for the finish on it and said we’d redo it one of these days. About seven years later, Mamabear started making comments about moving back to Michigan; I knew I’d better get off my duff and get the table redone while I still had a friendly garage to do it in. Since this was Memorial day weekend; I figured it was the perfect time to tackle this summer project. I intended from the start to document this project, but got a bit excited about doing this myself and forgot to take pictures of the table before I started. Prior to beginning the project, the finish on the table completely obscured the wood grain and was an olive-tan color. Definitely an ugly beast.
Saturday, we got up and went over to our local Lowe’s store to pick up some needed supplies. Before I go into any further details on this project; I’m going to remind you to read and follow all the safety instructions from the manufacturer on whatever chemicals or tools that you use when doing this sort of thing. Some of the stuff used can be extremely dangerous if mishandled!
Back to the project, at Lowe’s we picked up2:
- AO Safety Chemical Splash/Impact Goggle: With a bit of adjustment to the headband, these goggles fit snuggly and comfortable. When I wore them with my contacts in; I had no problems but I found while wearing my glasses, the goggles got steamed up quickly which could be problematic. When I bought these goggles; Lowes had it in a set with a dust mask and a set of ear plugs for slightly more money. That’s something one should definitely consider if they’re going to do a lot of working with powertools.
- 8 Pack of 3023-01 LG STRIPPER GLOVE: These gloves are designed to protect your hands while stripping wood. I found the cotton lining just absorbed my sweat making wearing the gloves later a nasty experience. Also, Lowes only had them in large when I picked up a pair and I found the size to be on the small side; given that you’re going to be wearing the gloves for several hours, try to plan for size discrepancies and get a pair that will comfortably fit you.
- Citristrip: Citrus Foam Spray (paint/varnish remover)
- Minwax Polyshades Old Maple Satin: Ariesna & I knew we wanted a darker color to our table. I knew that I wanted the table done this weekend, so I picked Minwax’s Polyshade Stain & Finish. Then we settled on the Old Maple Satin finish. For our table, we only bought 1 can (the 1 quart size) and I used about a third of it.
- Woosters Polyurethane Brush (3″ Pro White China Bristle):
- Steel Wool: I bought a bundle package with several pieces with various levels of coarseness. I mostly got it for the very fine steel wool as most the websites I’d checked in my researching for this project recommended using it between coats of the polyurethane finish.
- Sandpaper, super-fine (220 grade)
- Klean-Strip’s Odorless Mineral Spirits: I picked this up for cleaning up after I was done with the table.
As we were walking to checkout, Ariesna asked me if I thought the table was going to be worth all this. I told her to consider what a new coffeetable would cost and she let the argument drop. Then we headed over to Mamabear’s house with the table and our supplies.
I put on an apron, my goggles, my gloves and the dust mask3. Then I carefully read the directions for the Citristrip, shook the can and sprayed down the table. I was surprised at how nice the stripper smelt. It was a very powerful orange scent, but no whiff of any harsh chemicals. You can stand a good, couple feet away from the item you’re spraying and still hit it. Though I did find that keeping the can within 12-18 inches resulted in better coverage of the area I was spraying. Also, since the spray foams up, it stuck to the legs very nicely. After you spray the wood down, Citristrip recommends that you leave it on the wood for at least 30 minutes but does say you can leave it on for upto 24 hours. We had some other errands to run and ended up leaving it on for ~90 minutes. Then I came back, suited up (only the gloves & apron this time) and started scraping off the foam & the old finish. I found that the majority of the finish slid off like butter on a hot knife (see Figure 002).
After I scraped the table completely down; I did notice some areas still had finish on them and I started to try removing it with the steel wool and sandpaper, but that was considerable more physical effort than I wanted to expend. Also, I still had some Citristrip left over; so I started to spray down the table again. Unfortunately, I didn’t have enough to complete over the table a 2nd time. Especially since I was making sure to lay down a much thicker coat of the spray this time; so I left about half the table top uncoated and went back to Lowe’s for a 2nd can. When I got back; I completed spraying down the table and let it sit for a couple more hours.

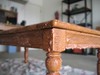
The plastic putty knife worked great for removing the spray & finish from the tabletop but wasn’t so good at curved surfaces like the legs. I found that a wet rag (in my case, an old towel) worked really well on the legs. I was also pleased to see that the table had some interesting wood grain; once I’d gotten rid of the old finish. Once the old finish had been completely removed; I knew I’d made a good choice to do this as the table already looked 100% improved. I gave the entire table a complete rubdown with a wet towel to make sure I’d removed all the citristrip and the old finish. Then I let the table dry over night.
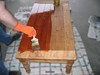
The next morning, I got up early (for me, on a weekend) came over to the table gave it a light sanding and a quick rubdown with a damp (but not soaking wet towel), let it dry for a few minutes and the started to lay down the first coat of the finish that we’d picked out. I probably could have put on just a clear coat of polyurethane but Ariesna & I are fans of the red/cherry-like finishes. Once completed, I realized a couple of mistakes that I’d made with the first coat:
- I didn’t stir the finish as well as I’d initially thought. So when I was working to get the color I wanted; I kept painting on more & more finish. All that excess finish caused some runs in the finish and the color wasn’t very even.
- I didn’t get down on the ground enough to look at the underside of table to see how much coverage I was getting on the lip and the edges of the tabletop.
- I tended to use short, fast strokes to lay down the finis; but to avoid bubbles, you need to use long, slow strokes.4
I did try to do what I could to correct these problems in the 2nd and final coat. I wasn’t particularly successful in cleaning up the legs but the tabletop does look excellent to my eyes. Even the sides of the table aren’t too bad, though they are far from perfect. Overall, I’d give myself a 3.5/5 points for the quality of the work I did, but then I’m probably being a bit kind on myself since I’ve not done anything like this since 7th grade shop class, more than a dozen years ago. Then again the new finish being such a vast improvement over the old one could also be influencing my perception.
1 She says it was $25. I remember it being $15, but I also know better than to argue with my wife too much. 🙂
2 Additionally, you’ll want to have some sort of tarp on the ground to keep the chemicals from getting all over your floor and some rags handy for clean-up (among other things). I was fortunate enough to get married recently and we got a number of new towels & sheets as wedding presents; so I had plenty of material handy for rags and a tarp. Also, Mamabear supplied me some old newspapers; which were useful to wipe the stripper/finish-sludge off of my putty knife and a good place to set down the can of finish while I was working on different parts of the table.
3 Chemical fumes tend to make me nauseous quickly, so I figured I’d try wearing this to see if it would help. As it turns out, I didn’t need the mask at all. See above for details.
4 I was in a bit of a hurry to meet some friends for coffee that morning and was running a bit behind schedule.
It looks very beautiful now. You did a GREAT job!! 🙂
It looks really good. I’m hoping to refinish a cedar-lined chest (also from a garage sale) once we’re in our house, so this is good info to have.
Thanks! Let me know when you’re looking to do the refinishing; as I’ve got some left over supplies that you could use.